Pattern libraries—or style guides—are a great tool when working on teams. We can communicate documentation of all the different website components, show how & when to use them and really see an overview of what’s available to build out a website.
Installation & setup
There are lots of different pattern library generation systems with lots of different features. This tutorial will concentrate on Jekyll Patternbot which is a plugin for Jekyll & therefore built with Ruby.
Tool installation
In order to get everything working there’s a bunch of stuff we need to install on our computers.
☛ Follow this step-by-step lesson to install all the developer tools
Basic setup
After you’ve got all that installed we still need to set up our folder with a few important files.
☛ Work through this step-by-step lesson on the basic setup
Hosting on Netlify
Even though we’re using Jekyll & it’s supported by GitHub, Jekyll Patternbot is not supported. We need to use another web-host that gives us more control over the tools we want to use.
Netlify is a good choice: they have a good CDN, a build process we can configure, free for small sites & some nice features.
☛ Check out this step-by-step lesson on setting up Netlify hosting
Starting & stopping
Jekyll & Patternbot are command-line tools, meaning we can only use them through our Terminal application. We also have to keep Jekyll running in the background in Terminal when we’re working on our website.
Starting
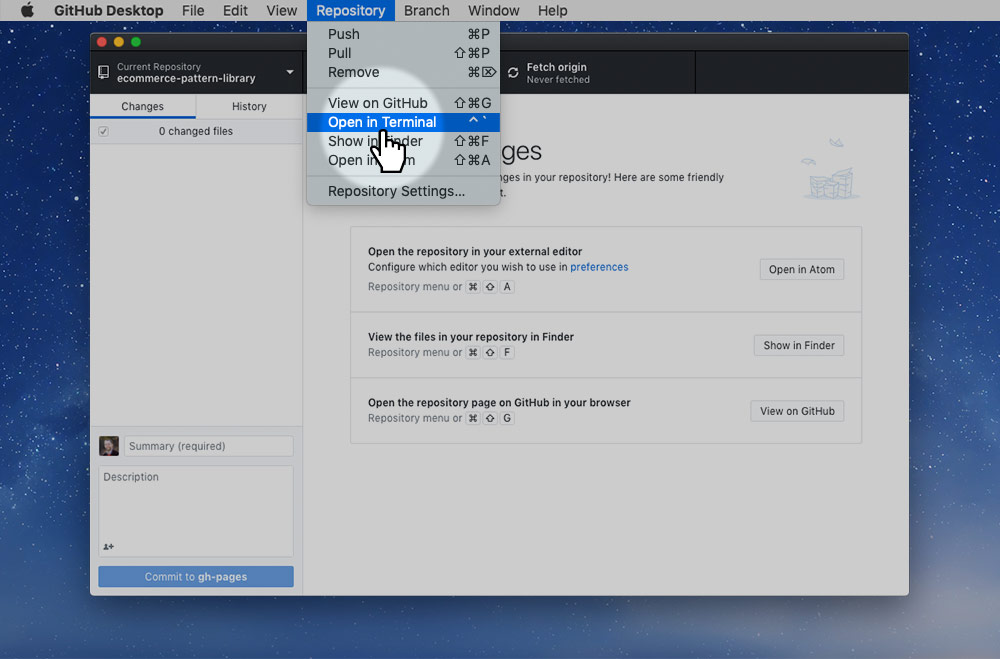
Inside GitHub Desktop, go to the Repository menu and press Open in Terminal—this will open the Terminal app and point it to the correct folder.
Once Terminal is open to the correct folder we can type this command: bundle exec jekyll serve—then hit Return.
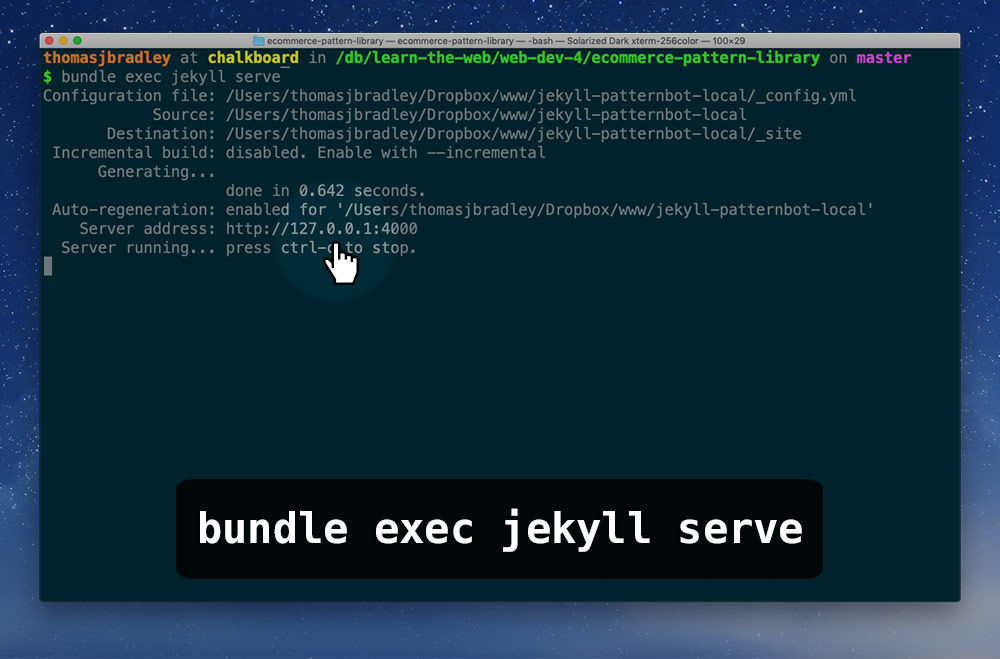
Running this command will start Jekyll. You must keep the Terminal window active for your website to function. You can minimize the window if you’d like. If you close the Terminal window Jekyll will stop running and your website will be inaccessible.
I’ve highlighted in the Terminal window an important bit: that’s the URL where you must view your website. So, let’s pop it open:
The IP address 127.0.0.1 and localhost are interchangeable—I just find localhost much easier to type.
Stopping
To top the process in Terminal press ⌃C (Control-C)—this will stop Jekyll from running & you’ll no longer be able to see your pattern library in the browser.
Re-starting
Restarting Jekyll is very simple. Open in Terminal again, but instead of typing the command, press the Up arrow. It’ll go through the command history. When you see bundle exec jekyll serve just hit Return
Theme
A good place to start our pattern library is by defining colours & CSS variables—and setting up our CSS itself.
Start by creating a CSS file named theme.css and putting it into your CSS folder.
Defining colours
At the top of your theme.css is a good place to add CSS variables. Patternbot recognizes variables that start with --color & --font and will use those in the component library.
:root {
  --color-primary: goldenrod;
  --color-primary-light: gold;
  --color-secondary: lightcoral;
  --color-secondary-dark: coral;
}
--color-primaryis treated as the most important colour.--color-secondaryis treated as the second most important colour.--color-neutral&--color-accentare grouped.
Adding fonts
It’s a good idea to also add your fonts into the :root declaration:
:root {
  ⋮
  --font-primary: "Alegreya Sans", "Trebuchet MS", Arial, sans-serif;
  --font-secondary: "Source Code Pro", Menlo, Consolas, monospace;
}
Patternbot recognizes --font-primary, --font-secondary as important fonts. But other names work just as well.
If these are Google or Typekit fonts you’ll also want to pop that into your _config.yml
patternbot:
  font_url: "https://fonts.googleapis.com/css?family=Overpass:400,400i,700|Source+Code+Pro:400,700"
Adding Web Dev Tools
Go ahead and get copies of all three Web Dev Tools naming the same we normally do:
css/modules.css— Modulifiercss/grid.css— Gridifiercss/type.css— Typografier
Basic styles
Put all the site-wide, basic styles within your theme.css file. Like heading colours, link colours, body copy colours, etc.
Combine into a mega CSS file
Make a new CSS file named main.css this is going to be a mega combination of all your CSS files & this is the file that Patternbot actually looks for.
Inside your main.css file we’re going to add a little bit of Jekyll code. This code instructs Jekyll to load all the other CSS files into this file—therefore combining them together into a single file.
---
---

{% include_relative modules.css %}
{% include_relative grid.css %}
{% include_relative type.css %}
{% include_relative theme.css %}
{% pattern_css %}
Yes! Those two lines of triple dashes are important. This code says:
- Get
modules.cssand place it here - Get
grid.cssand place it here - Get
type.cssand place it here - Get
theme.cssand place it here - Find all the pattern CSS files and place them here (discussed this below)
Customization
We can customize how Patternbot generates your component library. By default, Patternbot will use things like --color-primary, --color-secondary, --font-primary, --font-secondary as part of its interface to make the component library match the theme.
But we can customize a little further using some configuration options. Open up your _config.yml file and underneath the patternbot entry try these options out:
patternbot:
  title: "Dino Rescue"
  description: |
    A small local dinosaur rescue organization specializing in herbivores. Dinos are in danger and we need to save them all!
title— allows us to change the title at the top of the pattern librarydescription— allows us to change the introduction paragraph
Interface colours
Taking the configuration a little further we can change the colours Patternbot uses in the component library interface:
patternbot:
  colors:
    background: "--color-neutral"
    accent: "--color-primary"
background— configures the background colour of the whole document from the default of whiteaccent— instead of using--color-primaryas the heading & accent colour for the interface
Variable names work. But do just plain old hex-colours.
Rationales
One of the major parts of making a pattern library is documentation: documenting when & how to use the patterns, and when to use fonts and colours.
Since Patternbot automatically pulls fonts and colours into its interface, we can write rationales for them inside _config.yml:
patternbot:
  rationales:
    typefaces.primary: |
        The primary typeface represents clarity and simplicity. It should be used for just about everything.
    typefaces.secondary: |
        The secondary typeface is specifically for code samples within the website.
    colors.primary: |
        Well it’s red because why not.
    colors.secondary: |
        This colour was chosen because it’s complementary to red. It should be used sparingly for little punches of difference.
Add a new entry inside patternbot named rationales. Within that you can write rationales for the specific fonts & colours.
If your variable is --color-primary the rationale entry will be colors.primary, etc. & similarly for fonts and typefaces.
Logos & icons
Patternbot is pretty smart about logos and icons and will go looking for them within your folder.
Logo sizes & variations
For logos, name your files like this:
images/logo.svgimages/logo-64.svgimages/logo-32.svgimages/logo-16.svg
Patternbot will show those in the interface to help you show off the different sizes & variations for the logo.
Icon spritesheets
If you have an icon spritesheet name the file icons.svg and plop it into your images folder and Patternbot will pick out the icons to display nicely.
Patterns
The main purpose of Patternbot is to create a pattern library. And Patternbot helps out with that by finding your components and displaying them in an interface.
First create a folder named _patterns. Inside that folder create as many folders as you want—each folder representing a group of related patterns.
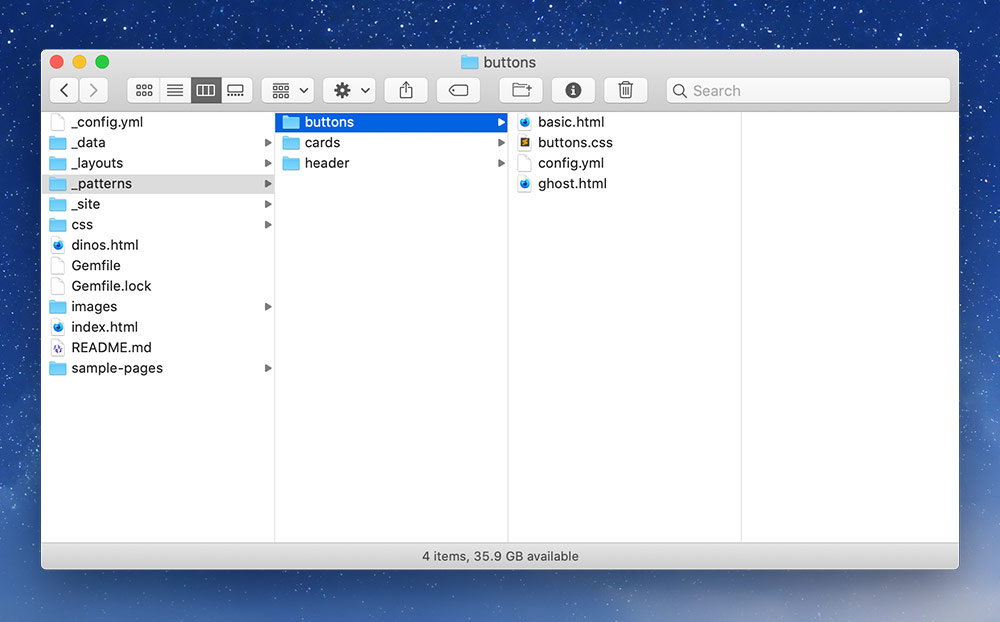
Each folder is a new pattern group with lots of patterns within. Inside your pattern folder you can add HTML files & CSS files.
- Each individual HTML file will show up in your pattern library as a single pattern to use.
- The CSS files will be automatically combined into your mega
main.css
Generally we have 1 CSS file & many HTML files.
Making a pattern
Inside the pattern HTML file you write only the HTML for the pattern itself. Don’t put the <!DOCTYPE>, don’t put <head>, don’t put <body>—and no CSS.
For a button your pattern HTML might look like this:
<a class="btn" href="#">Visit the Dino Park</a>
And that’s all.
A card might look like this:
<div class="card">
  <img src="/images/cards/brontosaurus.jpg" alt="">
  <h2>Brontosaurus</h2>
  <p>A popular long-necked dinosaur.</p>
</div>
Styling patterns
Using the pattern specific CSS file, like _patterns/cards/cards.css, you can write CSS specifically targeted at that single pattern.
.card {
  border: 3px solid var(--color-primary-dark);
}
- Be careful to only write CSS specific to that pattern
- You can use your variables defined in
theme.css
Never target a tag directly
Inside your pattern CSS files never target and HTML tag directly—make heavy use of classes. Because the website creates one large CSS file, essentially all CSS technically affects all patterns.
h2 { /* Don’t do this in pattern CSS files! */
  color: red;
}
Don’t do this! It would change every <h2> in every pattern. The only place it’s safe—and expected—to target tags directly is inside your theme.css
Using patterns
After you’ve created patterns you can use them in other places: pages, layouts—even other patterns.
Patternbot will give you a little snippet of code that you can copy-and-paste.
{% pattern buttons/basic %}
This is essentially a Jekyll include, but looking directly inside the _pattern folder. The above snippet will look in _patterns/buttons/ for an HTML file named basic.html
You can use this snippet of code within other patterns too! Maybe I want a button within my card, I could do this:
<div class="card">
  <img src="/images/cards/brontosaurus.jpg" alt="">
  <h2>Brontosaurus</h2>
  <p>A popular long-necked dinosaur.</p>
  {% pattern buttons/basic %}
</div>
Our card would then go find the button pattern and insert it. Sharing the HTML and preventing us from duplicating our code.
Changing pattern information
Quite often we want to be able to change information within our patterns. For buttons we want the text to change & the URL to change.
Within the pattern HTML we can add placeholders for things we want to be changeable using some Jekyll syntax.
<a class="btn" href="{{include.url}}">{{include.text}}</a>
There are two place holders in this pattern:
{{include.url}}will fill in thehrefattribute{{include.text}}will fill in the button’s text
If we look back at our card example now, we can configure what the button says & where it goes.
<div class="card">
  <img src="/images/cards/brontosaurus.jpg" alt="">
  <h2>Brontosaurus</h2>
  <p>A popular long-necked dinosaur.</p>
  {% pattern buttons/basic url="/bronto" text="See Brontosaurus" %}
</div>
Inside the {% pattern %} tag we can add attributes—just like HTML—to pass information into the pattern.
url="/bronto"would insert into the{{include.url}}placeholdertext="See Brontosaurus"would insert into the{{include.text}}placeholder
Documenting the pattern
Now that we have placeholders within our pattern we want to document that within our pattern library to help other developers and designers understand how to use the pattern.
Add a new file into the pattern folder named config.yml, for example, our buttons: _patterns/buttons/config.yml
Inside the config.yml file we can add some information:
patterns:
  basic:
    fields:
      - name: 'url'
        type: 'url'
        example: '/dinosaurs'
      - name: 'text'
        type: 'string'
        example: '/See all dinosaurs'
Inside a patterns entry make a new entry named exactly after the HTML document (without the .html). The another sub-entry named fields
We can then list out the fields—aka placeholders—specifying:
name— the name of the placeholder, the bit that comes afterinclude.type— the kind of information that it’s expectingexample— an example of the kind of information (Patternbot will also use this to display in the component library)
☛ See the Patternbot cheat sheet for all the options
Sample pages
To show-off how the patterns look together inside full pages you can create some sample pages.
Make a new folder named sample-pages and drop some HTML files in there—the names will pop-up into Patternbot’s menu.
It’s all Jekyll
Remember that Patternbot is built on top of Jekyll—many of its features are just features of Jekyll. You can integrate Jekyll & Patternbot features together perfectly well.
Video list
- Jekyll + Patternbot: Installation & setup
- Jekyll + Patternbot: Hosting on Netlify
- Jekyll + Patternbot: Starting & stopping
- Jekyll + Patternbot: Theme colours
- Jekyll + Patternbot: Theme fonts
- Jekyll + Patternbot: Web Dev Tools
- Jekyll + Patternbot: Basic theme styles
- Jekyll + Patternbot: CSS utility classes
- Jekyll + Patternbot: Design customization
- Jekyll + Patternbot: Rationales
- Jekyll + Patternbot: Logos
- Jekyll + Patternbot: Icons
- Jekyll + Patternbot: Simple pattern
- Jekyll + Patternbot: Pattern config
- Jekyll + Patternbot: Patterns inside patterns
- Jekyll + Patternbot: Layouts
- Jekyll + Patternbot: Datasets
- Jekyll + Patternbot: Sample pages
Supplemental links
- StyleGuides.io
- Content Modeling With Jekyll
- Style Guide Generator Roundup · An A List Apart Blog Post
- Adele - Design Systems and Pattern Libraries Repository
Amazing pattern libraries
- MailChimp Pattern Library
- HMCTS Design System
- U.S. Web Design System
- GitHub Style Guide
- Walmart Styleguide